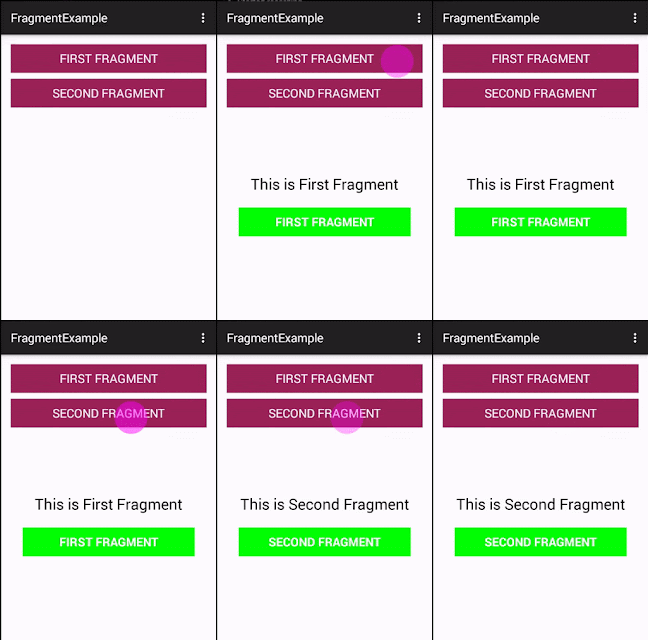
In Android, Fragment is a part of an activity which enable more modular activity design. It will not be wrong if we say a fragment is a kind of sub-activity. It represents a behaviour or a portion of user interface in an Activity. We can combine multiple Fragments in Single Activity to build a multi panel UI and reuse a Fragment in multiple Activities. We always need to embed Fragment in an activity and the fragment lifecycle is directly affected by the host activity’s lifecycle.
Step 1. Create a new project and name it FragmentExampleStep 2: Open res -> layout ->activity_main.xml (or) main.xml and add following code:
<LinearLayout xmlns:android="http://schemas.android.com/apk/res/android"Step 3: Open src -> package -> MainActivity.java
xmlns:tools="http://schemas.android.com/tools"
android:layout_width="match_parent"
android:layout_height="match_parent"
android:orientation="vertical"
android:paddingBottom="@dimen/activity_vertical_margin"
android:paddingLeft="@dimen/activity_horizontal_margin"
android:paddingRight="@dimen/activity_horizontal_margin"
android:paddingTop="@dimen/activity_vertical_margin"
tools:context=".MainActivity">
<Button
android:id="@+id/firstFragment"
android:layout_width="match_parent"
android:layout_height="wrap_content"
android:background="@color/button_background_color"
android:text="First Fragment"
android:textColor="@color/white"
android:textSize="20sp" />
<Button
android:id="@+id/secondFragment"
android:layout_width="match_parent"
android:layout_height="wrap_content"
android:layout_marginTop="10dp"
android:background="@color/button_background_color"
android:text="Second Fragment"
android:textColor="@color/white"
android:textSize="20sp" />
<FrameLayout
android:id="@+id/frameLayout"
android:layout_width="match_parent"
android:layout_height="match_parent"
android:layout_marginTop="10dp" />
</LinearLayout>
import android.app.Fragment;Step 4: Now we need 2 fragments and 2 xml layouts.
import android.app.FragmentManager;
import android.app.FragmentTransaction;
import android.support.v7.app.AppCompatActivity;
import android.os.Bundle;
import android.view.View;
import android.widget.Button;
public class MainActivity extends AppCompatActivity {
Button firstFragment, secondFragment;
@Override
protected void onCreate(Bundle savedInstanceState) {
super.onCreate(savedInstanceState);
setContentView(R.layout.activity_main);
// get the reference of Button's
firstFragment = (Button) findViewById(R.id.firstFragment);
secondFragment = (Button) findViewById(R.id.secondFragment);
// perform setOnClickListener event on First Button
firstFragment.setOnClickListener(new View.OnClickListener() {
@Override
public void onClick(View v) {
// load First Fragment
loadFragment(new FirstFragment());
}
});
// perform setOnClickListener event on Second Button
secondFragment.setOnClickListener(new View.OnClickListener() {
@Override
public void onClick(View v) {
// load Second Fragment
loadFragment(new SecondFragment());
}
});
}
private void loadFragment(Fragment fragment) {
// create a FragmentManager
FragmentManager fm = getFragmentManager();
// create a FragmentTransaction to begin the transaction and replace the Fragment
FragmentTransaction fragmentTransaction = fm.beginTransaction();
// replace the FrameLayout with new Fragment
fragmentTransaction.replace(R.id.frameLayout, fragment);
fragmentTransaction.commit(); // save the changes
}
}
FirstFragment.class
import android.app.Fragment;SecondFragment.class
import android.os.Bundle;
import android.view.LayoutInflater;
import android.view.View;
import android.view.ViewGroup;
import android.widget.Button;
import android.widget.Toast;
public class FirstFragment extends Fragment {
View view;
Button firstButton;
@Override
public View onCreateView(LayoutInflater inflater, ViewGroup container,
Bundle savedInstanceState) {
// Inflate the layout for this fragment
view = inflater.inflate(R.layout.fragment_first, container, false);
// get the reference of Button
firstButton = (Button) view.findViewById(R.id.firstButton);
// perform setOnClickListener on first Button
firstButton.setOnClickListener(new View.OnClickListener() {
@Override
public void onClick(View v) {
// display a message by using a Toast
Toast.makeText(getActivity(), "First Fragment", Toast.LENGTH_LONG).show();
}
});
return view;
}
}
import android.app.Fragment;Step 5: Now create 2 xml layouts by right clicking on res/layout -> New -> Layout
import android.os.Bundle;
import android.view.LayoutInflater;
import android.view.View;
import android.view.ViewGroup;
import android.widget.Button;
import android.widget.Toast;
public class SecondFragment extends Fragment {
View view;
Button secondButton;
@Override
public View onCreateView(LayoutInflater inflater, ViewGroup container,
Bundle savedInstanceState) {
// Inflate the layout for this fragment
view = inflater.inflate(R.layout.fragment_second, container, false);
// get the reference of Button
secondButton = (Button) view.findViewById(R.id.secondButton);
// perform setOnClickListener on second Button
secondButton.setOnClickListener(new View.OnClickListener() {
@Override
public void onClick(View v) {
// display a message by using a Toast
Toast.makeText(getActivity(), "Second Fragment", Toast.LENGTH_LONG).show();
}
});
return view;
}
}
fragment_first.xml
<RelativeLayout xmlns:android="http://schemas.android.com/apk/res/android"fragment_second.xml
xmlns:tools="http://schemas.android.com/tools"
android:layout_width="match_parent"
android:layout_height="match_parent"
tools:context="com.abhiandroid.fragmentexample.FirstFragment">
<!--TextView and Button displayed in First Fragment -->
<TextView
android:layout_width="wrap_content"
android:layout_height="wrap_content"
android:layout_centerHorizontal="true"
android:layout_marginTop="100dp"
android:text="This is First Fragment"
android:textColor="@color/black"
android:textSize="25sp" />
<Button
android:id="@+id/firstButton"
android:layout_width="fill_parent"
android:layout_height="wrap_content"
android:layout_centerInParent="true"
android:layout_marginLeft="20dp"
android:layout_marginRight="20dp"
android:background="@color/green"
android:text="First Fragment"
android:textColor="@color/white"
android:textSize="20sp"
android:textStyle="bold" />
</RelativeLayout>
<RelativeLayout xmlns:android="http://schemas.android.com/apk/res/android"Step 6: Open res ->values ->colors.xml
xmlns:tools="http://schemas.android.com/tools"
android:layout_width="match_parent"
android:layout_height="match_parent"
tools:context="com.abhiandroid.fragmentexample.SecondFragment">
<!--TextView and Button displayed in Second Fragment -->
<TextView
android:layout_width="wrap_content"
android:layout_height="wrap_content"
android:layout_centerHorizontal="true"
android:layout_marginTop="100dp"
android:text="This is Second Fragment"
android:textColor="@color/black"
android:textSize="25sp" />
<Button
android:id="@+id/secondButton"
android:layout_width="fill_parent"
android:layout_height="wrap_content"
android:layout_centerInParent="true"
android:layout_marginLeft="20dp"
android:layout_marginRight="20dp"
android:background="@color/green"
android:text="Second Fragment"
android:textColor="@color/white"
android:textSize="20sp"
android:textStyle="bold" />
</RelativeLayout>
In this step we define the color’s that used in our xml file.
<?xml version="1.0" encoding="utf-8"?>Step 7: Open AndroidManifest.xml
<resources>
<!-- color's used in our project -->
<color name="black">#000</color>
<color name="green">#0f0</color>
<color name="white">#fff</color>
<color name="button_background_color">#925</color>
</resources>
<?xml version="1.0" encoding="utf-8"?>
<manifest xmlns:android="http://schemas.android.com/apk/res/android"
package="com.abhiandroid.fragmentexample" >
<application
android:allowBackup="true"
android:icon="@mipmap/ic_launcher"
android:label="@string/app_name"
android:theme="@style/AppTheme" >
<activity
android:name=".MainActivity"
android:label="@string/app_name" >
<intent-filter>
<action android:name="android.intent.action.MAIN" />
<category android:name="android.intent.category.LAUNCHER" />
</intent-filter>
</activity>
</application>
</manifest>


No comments:
Post a Comment