In Android example, Button in android is a user interface control used to perform an action whenever a user clicks or clicks on it.
Generally, the buttons in Android will contain a text or an icon or both and perform an action when the user touches it.
The following is a representative image of the use of android circle button apps.
Android buttons for example
In Android, we have a different type of button available to use based on our requirements, which is ImageButton, ToggleButton, RadioButton.
In Android, we can create a Button control in two ways in an XML layout file or create it in an Activity file programmatically.
In android, we can define button click event in two ways either in XML layout file or create it in Activity file programmatically.
The value of android:onClick attribute must be the name of method which we need to call in response to a click event and the Activity file which hosting XML layout must implement the corresponding method.
Following is the example of defining a button click event using android:onClick attribute in XML layout file.

Generally, the buttons in Android will contain a text or an icon or both and perform an action when the user touches it.
The following is a representative image of the use of android circle button apps.
Android buttons for example
In Android, we have a different type of button available to use based on our requirements, which is ImageButton, ToggleButton, RadioButton.
In Android, we can create a Button control in two ways in an XML layout file or create it in an Activity file programmatically.
Create Button in XML Layout
<LinearLayout xmlns:android="http://schemas.android.com/apk/res/android"
android:orientation="vertical" android:layout_width="match_parent"
android:layout_height="match_parent">
<Button
android:id="@+id/addBtn"
android:layout_width="wrap_content"
android:layout_height="wrap_content"
android:text="Add" />
</LinearLayout>
Create Button Control in Activity
In android, we can create circle button android control programmatically in activity file based on our requirements.
Following is the example of creating Button control dynamically in activity file.
LinearLayout layout = (LinearLayout)findViewById(R.id.l_layout);
Button btn = new Button(this);
btn.setText("Test");
layout.addView(btn);
Android Handle Button Click Events
Generally, whenever the user clicks on a android round button, the Button object will receives an on-click event.In android, we can define button click event in two ways either in XML layout file or create it in Activity file programmatically.
Define Button Click Event in XML Layout File
We can define click event handler for button by adding android:onClick attribute to the <Button> element in our XML layout file.The value of android:onClick attribute must be the name of method which we need to call in response to a click event and the Activity file which hosting XML layout must implement the corresponding method.
Following is the example of defining a button click event using android:onClick attribute in XML layout file.
<?xml version="1.0" encoding="utf-8"?>
<LinearLayout xmlns:android="http://schemas.android.com/apk/res/android"
android:orientation="vertical" android:layout_width="match_parent"
android:layout_height="match_parent">
<Button
android:id="@+id/addBtn"
android:layout_width="wrap_content"
android:layout_height="wrap_content"
android:text="Add"
android:onClick="addOperation"/>
</LinearLayout>
Android Button Example
activity_main.xml
<?xml version="1.0" encoding="utf-8"?>MainActivity.java
<LinearLayout xmlns:android="http://schemas.android.com/apk/res/android"
android:orientation="vertical" android:layout_width="match_parent"
android:layout_height="match_parent">
<TextView
android:id="@+id/fstTxt"
android:layout_width="wrap_content"
android:layout_height="wrap_content"
android:layout_marginLeft="100dp"
android:layout_marginTop="150dp"
android:text="First Number" />
<EditText
android:id="@+id/firstNum"
android:layout_width="wrap_content"
android:layout_height="wrap_content"
android:layout_marginLeft="100dp"
android:ems="10" />
<TextView
android:id="@+id/secTxt"
android:layout_width="wrap_content"
android:layout_height="wrap_content"
android:text="Second Number"
android:layout_marginLeft="100dp" />
<EditText
android:id="@+id/secondNum"
android:layout_width="wrap_content"
android:layout_height="wrap_content"
android:layout_marginLeft="100dp"
android:ems="10" />
<Button
android:id="@+id/addBtn"
android:layout_width="wrap_content"
android:layout_height="wrap_content"
android:layout_marginLeft="100dp"
android:text="Add" />
</LinearLayout>
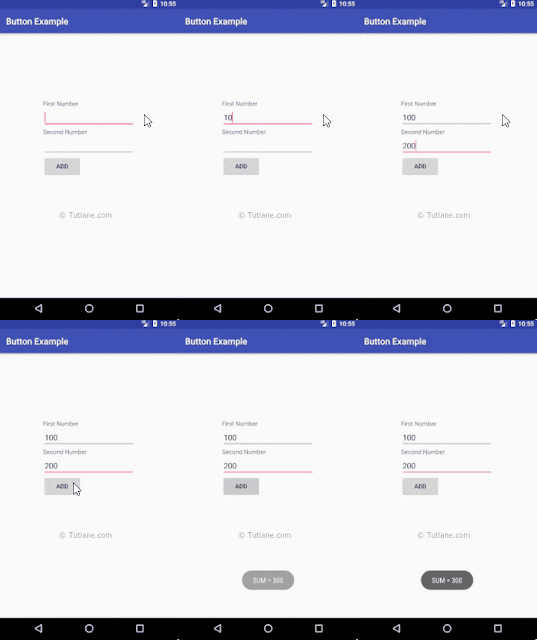
public class MainActivity extends AppCompatActivity {Output of Android Button Example
@Override
protected void onCreate(Bundle savedInstanceState) {
super.onCreate(savedInstanceState);
setContentView(R.layout.activity_main);
final EditText firstNum = (EditText)findViewById(R.id.firstNum);
final EditText secNum = (EditText)findViewById(R.id.secondNum);
Button btnAdd = (Button)findViewById(R.id.addBtn);
btnAdd.setOnClickListener(new View.OnClickListener() {
@Override
public void onClick(View v) {
if(firstNum.getText().toString().isEmpty() || secNum.getText().toString().isEmpty())
{
Toast.makeText(getApplicationContext(), "Please fill all the fields", Toast.LENGTH_SHORT).show();
}
else {
int num1 = Integer.parseInt(firstNum.getText().toString());
int num2 = Integer.parseInt(secNum.getText().toString());
Toast.makeText(getApplicationContext(), "SUM = " + (num1 + num2), Toast.LENGTH_SHORT).show();
}
}
});
}
}


No comments:
Post a Comment