Step 1: Create a new project and name it SimpleAdapterExample.
Step 2: Open res -> layout -> xml (or) main.xml and add following code :
In this step we open an xml file and add the code for displaying a ListView by using its different attributes.
Step 4: Open src -> package -> MainActivity.java
In this step we add the code for initiate ListView and set the data in the list. In this firstly we create two arrays first for fruit names and second for fruits images and then set the data in the ListView using SimpleAdapter.
In this step we create a xml file for displaying ListView items. In this xml we add the code for displaying a ImageView and a TextView.
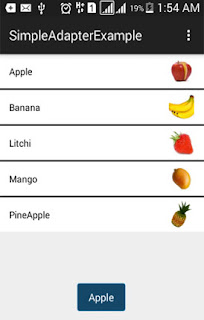
Now run the App and you will different fruit names listed in ListView. Here we used Simple Adapter to fill data in ListView.

Step 2: Open res -> layout -> xml (or) main.xml and add following code :
In this step we open an xml file and add the code for displaying a ListView by using its different attributes.
<RelativeLayout xmlns:android="http://schemas.android.com/apk/res/android"Step 3: Save fruit images in drawable folder with name apple, banana, litchi, mango and pineapple.
xmlns:tools="http://schemas.android.com/tools"
android:layout_width="match_parent"
android:layout_height="match_parent"
tools:context=".MainActivity">
<ListView
android:id="@+id/simpleListView"
android:layout_width="match_parent"
android:layout_height="wrap_content"
android:divider="#000"
android:dividerHeight="2dp"
android:listSelector="#600"/>
</RelativeLayout>
Step 4: Open src -> package -> MainActivity.java
In this step we add the code for initiate ListView and set the data in the list. In this firstly we create two arrays first for fruit names and second for fruits images and then set the data in the ListView using SimpleAdapter.
import android.support.v7.app.AppCompatActivity;Step 5: Create new layout-> rec-> layout-> list_view_items.xml and add following code:
import android.os.Bundle;
import android.view.Menu;
import android.view.MenuItem;
import android.view.View;
import android.widget.AdapterView;
import android.widget.ListView;
import android.widget.SimpleAdapter;
import android.widget.Toast;
import java.util.ArrayList;
import java.util.HashMap;
public class MainActivity extends AppCompatActivity {
//initialize view's
ListView simpleListView;
String[] fruitsNames = {"Apple", "Banana", "Litchi", "Mango", "PineApple"};//fruit names array
int[] fruitsImages = {R.drawable.apple, R.drawable.banana, R.drawable.litchi, R.drawable.mango, R.drawable.pineapple};//fruits images
@Override
protected void onCreate(Bundle savedInstanceState) {
super.onCreate(savedInstanceState);
setContentView(R.layout.activity_main);
simpleListView=(ListView)findViewById(R.id.simpleListView);
ArrayList<HashMap<String,String>> arrayList=new ArrayList<>();
for (int i=0;i<fruitsNames.length;i++)
{
HashMap<String,String> hashMap=new HashMap<>();//create a hashmap to store the data in key value pair
hashMap.put("name",fruitsNames[i]);
hashMap.put("image",fruitsImages[i]+"");
arrayList.add(hashMap);//add the hashmap into arrayList
}
String[] from={"name","image"};//string array
int[] to={R.id.textView,R.id.imageView};//int array of views id's
SimpleAdapter simpleAdapter=new SimpleAdapter(this,arrayList,R.layout.list_view_items,from,to);//Create object and set the parameters for simpleAdapter
simpleListView.setAdapter(simpleAdapter);//sets the adapter for listView
//perform listView item click event
simpleListView.setOnItemClickListener(new AdapterView.OnItemClickListener() {
@Override
public void onItemClick(AdapterView<?> adapterView, View view, int i, long l) {
Toast.makeText(getApplicationContext(),fruitsNames[i],Toast.LENGTH_LONG).show();//show the selected image in toast according to position
}
});
}
}
In this step we create a xml file for displaying ListView items. In this xml we add the code for displaying a ImageView and a TextView.
<?xml version="1.0" encoding="utf-8"?>Output:
<RelativeLayout xmlns:android="http://schemas.android.com/apk/res/android"
android:layout_width="match_parent"
android:layout_height="wrap_content"
android:background="#fff">
<ImageView
android:id="@+id/imageView"
android:layout_width="50dp"
android:layout_height="50dp"
android:padding="5dp"
android:layout_alignParentRight="true"
android:layout_marginRight="10dp"
android:src="@drawable/ic_launcher" />
<TextView
android:id="@+id/textView"
android:layout_width="wrap_content"
android:layout_height="wrap_content"
android:padding="@dimen/activity_horizontal_margin"
android:text="Demo"
android:textColor="#000" />
</RelativeLayout>
Now run the App and you will different fruit names listed in ListView. Here we used Simple Adapter to fill data in ListView.


No comments:
Post a Comment