Step 1. Create new Angular 8 project
The canActivate() method returns true if the isLoggedIn() methods returns true i.e if the user is logged in.
If the canActivate() method returns true the route which has this guard applied can be accessed by the user.
Next, you need to apply this guard to the route you want to protect. Open the src/app/app-routing.module.ts file and update it accordingly:
Open the src/app/app.module.ts file and update it accordingly:
FormBuilder, FormGroup, Validators symbols that are used to create Angular reactive forms,
Router for routing, AuthService and the User model.
Open the src/styles.css and add:

Also, add this CSS style for error class:

Implementing the Admin Component
Open the src/app/admin.component.ts file and add:
ng new angular-login-demoStep 2. Generating Login and Admin Components
ng g c loginStep 3. Add file src/app/app-routing.module.ts
ng g c admin
import { NgModule } from '@angular/core';Step 4. Open the src/app/app.component.html file and remove everything but leave <router-outlet>:
import { Routes, RouterModule } from '@angular/router';
import { LoginComponent } from './login/login.component';
import { AdminComponent } from './admin/admin.component';
const routes: Routes = [
{ path: '', pathMatch: 'full', redirectTo: 'login'},
{ path: 'login', component: LoginComponent },
{ path: 'admin', component: AdminComponent }
];
@NgModule({
imports: [RouterModule.forRoot(routes)],
exports: [RouterModule]
})
export class AppRoutingModule { }
<router-outlet></router-outlet>Step 5. Generating the User Model/Interface
ng g interface userOpen the src/app/user.ts file and update it accordingly:
export interface User {Step 5. Generating an Angular Authentication Service
email: string;
password: string;
}
ng g service authOpen the src/app/auth.service.ts file and update it accordingly:
import { Injectable } from '@angular/core';Step 6. Creating a Router Guard
import { User } from './user';
@Injectable({
providedIn: 'root'
})
export class AuthService {
constructor() { }
public login(userInfo: User){
localStorage.setItem('ACCESS_TOKEN', "access_token");
}
public isLoggedIn(){
return localStorage.getItem('ACCESS_TOKEN') !== null;
}
public logout(){
localStorage.removeItem('ACCESS_TOKEN');
}
}
ng generate guard authOpen the src/app/auth.guard.ts file and update it accordingly:
import { Injectable } from '@angular/core';We import AuthService and inject it via the class constructor then in the canActivate() method, we call and return the isLoggedIn() method.
import { CanActivate, ActivatedRouteSnapshot, RouterStateSnapshot } from '@angular/router';
import { Observable } from 'rxjs';
import { AuthService } from './auth.service';
@Injectable({
providedIn: 'root'
})
export class AuthGuard implements CanActivate {
constructor(private authService: AuthService){}
canActivate(
next: ActivatedRouteSnapshot,
state: RouterStateSnapshot): Observable<boolean> | Promise<boolean> | boolean {
return this.authService.isLoggedIn();
}
}
The canActivate() method returns true if the isLoggedIn() methods returns true i.e if the user is logged in.
If the canActivate() method returns true the route which has this guard applied can be accessed by the user.
Next, you need to apply this guard to the route you want to protect. Open the src/app/app-routing.module.ts file and update it accordingly:
import { NgModule } from '@angular/core';Step 7. Creating the Login Form using Angular 8 Reactive Forms
import { Routes, RouterModule } from '@angular/router';
import { LoginComponent } from './login/login.component';
import { AdminComponent } from './admin/admin.component';
import { AuthGuard } from './auth.guard';
const routes: Routes = [
{ path: '', pathMatch: 'full', redirectTo: 'login'},
{ path: 'login', component: LoginComponent },
{ path: 'admin', component: AdminComponent, canActivate: [AuthGuard] }
];
@NgModule({
imports: [RouterModule.forRoot(routes)],
exports: [RouterModule]
})
export class AppRoutingModule { }
Open the src/app/app.module.ts file and update it accordingly:
import { BrowserModule } from '@angular/platform-browser';Open the src/app/login.component.ts file and import:
import { NgModule } from '@angular/core';
import { FormsModule, ReactiveFormsModule} from '@angular/forms';
import { AppRoutingModule } from './app-routing.module';
import { AppComponent } from './app.component';
import { LoginComponent } from './login/login.component';
import { AdminComponent } from './admin/admin.component';
@NgModule({
declarations: [
AppComponent,
LoginComponent,
AdminComponent
],
imports: [
BrowserModule,
FormsModule,
ReactiveFormsModule,
AppRoutingModule
],
providers: [],
bootstrap: [AppComponent]
})
export class AppModule { }
FormBuilder, FormGroup, Validators symbols that are used to create Angular reactive forms,
Router for routing, AuthService and the User model.
import { FormBuilder, FormGroup, Validators } from '@angular/forms';Next, inject the FormBuilder, Router and AuthService via the service constructor:
import { Router } from '@angular/router';
import { User } from '../user';
import { AuthService } from '../auth.service';
export class LoginComponent implements OnInit {Next, add these service variables:
constructor(private authService: AuthService, private router: Router, private formBuilder: FormBuilder ) { }
ngOnInit() {
}
}
Next, in the ngOnInit() life-cycle event, create the form:
loginForm: FormGroup;
isSubmitted = false;
Next, add a get property to make easy to access the form controls on the HTML form:
ngOnInit() {
this.loginForm = this.formBuilder.group({
email: ['', Validators.required],
password: ['', Validators.required]
});
}
get formControls() { return this.loginForm.controls; }Finally, add the login() method:
login(){Let's now create the HTML form. Open the src/app/login.component.html file and the following content:
console.log(this.loginForm.value);
this.isSubmitted = true;
if(this.loginForm.invalid){
return;
}
this.authService.login(this.loginForm.value);
this.router.navigateByUrl('/admin');
}
<h1 style="text-align:center">For styling the form we'll be using this codepen example.
Angular Login Example
</h1>
<div class="login">
<h2 class="login-header">Log in</h2>
<form [formGroup]="loginForm" class="login-container" (ngSubmit)="login()">
<p [ngClass]="{ 'has-error': isSubmitted && formControls.email.errors }">
<input type="email" placeholder="Email" formControlName="email">
</p>
<div *ngIf="isSubmitted && formControls.email.errors" class="help-block">
<div *ngIf="formControls.email.errors.required">Email is required</div>
</div>
<p [ngClass]="{ 'has-error': isSubmitted && formControls.password.errors }">
<input type="password" placeholder="Password" formControlName="password">
</p>
<div *ngIf="isSubmitted && formControls.password.errors" class="help-block">
<div *ngIf="formControls.password.errors.required">Password is required</div>
</div>
<p>
<input type="submit" value="Log in">
</p>
</form>
</div>
Open the src/styles.css and add:
@import url(https://fonts.googleapis.com/css?family=Open+Sans:400,700);Next, open the src/app/login.component.css file and these styles:
body {
background: #456;
font-family: 'Open Sans', sans-serif;
}
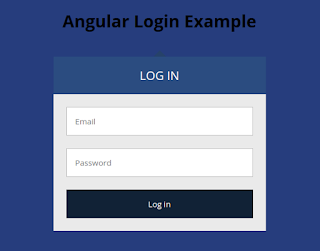
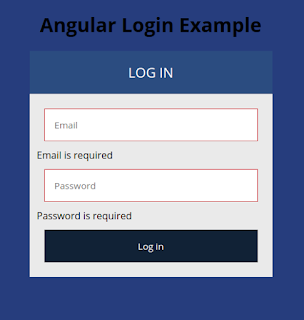
.login {This is the screenshot of our reactive login form in angular:
width: 400px;
margin: 16px auto;
font-size: 16px;
}
.login-header,
.login p {
margin-top: 0;
margin-bottom: 0;
}
.login-triangle {
width: 0;
margin-right: auto;
margin-left: auto;
border: 12px solid transparent;
border-bottom-color: rgb(15, 66, 107);
}
.login-header {
background: rgb(12, 77, 129);
padding: 20px;
font-size: 1.4em;
font-weight: normal;
text-align: center;
text-transform: uppercase;
color: #fff;
}
.login-container {
background: #ebebeb;
padding: 12px;
}
.login p {
padding: 12px;
}
.login input {
box-sizing: border-box;
display: block;
width: 100%;
border-width: 1px;
border-style: solid;
padding: 16px;
outline: 0;
font-family: inherit;
font-size: 0.95em;
}
.login input[type="email"],
.login input[type="password"] {
background: #fff;
border-color: #bbb;
color: #555;
}
.login input[type="email"]:focus,
.login input[type="password"]:focus {
border-color: #888;
}
.login input[type="submit"] {
background: rgb(1, 29, 51);
border-color: transparent;
color: #fff;
cursor: pointer;
}
.login input[type="submit"]:hover {
background: #17c;
}
.login input[type="submit"]:focus {
border-color: #05a;
}

Also, add this CSS style for error class:
.has-error input[type="email"],
.has-error input[type="password"] {
border-color: rgb(216, 12, 12);
color: rgb(230, 14, 14);
}

Implementing the Admin Component
Open the src/app/admin.component.ts file and add:
import { Component, OnInit } from '@angular/core';Next, open the src/app/admin.component.html file and add:
import { Router } from '@angular/router';
import { AuthService } from '../auth.service';
@Component({
selector: 'app-admin',
templateUrl: './admin.component.html',
styleUrls: ['./admin.component.css']
})
export class AdminComponent implements OnInit {
constructor(private authService: AuthService, private router: Router) { }
ngOnInit() {
}
logout(){
this.authService.logout();
this.router.navigateByUrl('/login');
}
}
<div style="text-align:center">Finally, open the src/app/admin.component.css file and add:
<h1>
Welcome Super Admin!
</h1>
<p>
<button (click)="logout()">
Logout
</button>
</p>
<img width="300" alt="Angular Logo" src="data:image/svg+xml;base64,PHN2ZyB4bWxucz0iaHR0cDovL3d3dy53My5vcmcvMjAwMC9zdmciIHZpZXdCb3g9IjAgMCAyNTAgMjUwIj4KICAgIDxwYXRoIGZpbGw9IiNERDAwMzEiIGQ9Ik0xMjUgMzBMMzEuOSA2My4ybDE0LjIgMTIzLjFMMTI1IDIzMGw3OC45LTQzLjcgMTQuMi0xMjMuMXoiIC8+CiAgICA8cGF0aCBmaWxsPSIjQzMwMDJGIiBkPSJNMTI1IDMwdjIyLjItLjFWMjMwbDc4LjktNDMuNyAxNC4yLTEyMy4xTDEyNSAzMHoiIC8+CiAgICA8cGF0aCAgZmlsbD0iI0ZGRkZGRiIgZD0iTTEyNSA1Mi4xTDY2LjggMTgyLjZoMjEuN2wxMS43LTI5LjJoNDkuNGwxMS43IDI5LjJIMTgzTDEyNSA1Mi4xem0xNyA4My4zaC0zNGwxNy00MC45IDE3IDQwLjl6IiAvPgogIDwvc3ZnPg==">
</div>
button{
background: rgb(1, 29, 51);
border-color: transparent;
color: #fff;
cursor: pointer;
}


No comments:
Post a Comment